- Published on
Securing Your API Keys with Next.js 13 and Serverless Functions: Building a Proxy to Safeguard Sensitive Information
- Authors
- Name
- Sam Mark
- @Twitter/smmk


Introduction
This post serves as an update to my previous article on creating a serverless function proxy using Next.js and serverless functions..
Welcome back to another exciting update on leveraging Next.js and Serverless Functions to enhance the security of your applications! In a previous article, we discussed how to create a proxy using Next.js and Serverless Functions to hide sensitive information, such as API keys. If you missed it, you can catch up on the details here.
In this updated version, we will explore the latest release, Next.js 13, and its powerful features that further strengthen the security of your application's sensitive data. We'll dive into creating a robust proxy solution to ensure your API keys remain hidden and safeguarded from unauthorized access. Let's get started on fortifying your application's security!
Environmental Variables: Safeguarding Your API Keys
When it comes to sensitive information like API keys, ensuring secure handling is of paramount importance. In our previous implementation of the proxy server, we used environmental variables to store such sensitive data, including the API key, on the server.
To set environmental variables on your server, there are various methods available depending on your hosting environment. Let's take a look at an example of setting the RAPIDAPI_KEY environmental variable:
export RAPIDAPI_KEY="your-api-key"
In this example, we set the RAPIDAPI_KEY variable to your actual API key. By using the export command, we make the variable accessible to the server and any processes running on it.
It's essential to note that hardcoding sensitive information directly into your code is a practice to avoid. By employing environmental variables, you can keep such sensitive information separate from your codebase, facilitating easier management and enhanced security.
Within our serverless function code, we retrieve the API key using process.env.RAPIDAPI_KEY. This allows us to fetch the value of the RAPIDAPI_KEY environmental variable within the serverless function. By referencing the API key through the environmental variable, we ensure its secure storage and keep it hidden from prying eyes.
Before deploying your application, it is crucial to properly configure the environmental variables on your hosting server or platform. This ensures that your proxy server can access the API key without exposing it in the code or in the response to the client.
By adopting a robust management strategy for environmental variables, you can significantly enhance the security of your application and protect sensitive information from unauthorized access.
Creating a Proxy Server with Next.js: Leveraging the new app/api routing structure
To establish a proxy server in Next.js, we can utilize serverless functions. In Next.js, these serverless functions are stored in the app/api directory and are automatically deployed as serverless endpoints.
The app directory serves as the entry point for your application's routes in Next.js. It consists of files that represent different app or routes within your application. Within the app directory, the api directory is specifically designated for serverless functions.
By creating a file in the app/api directory, you effectively create a serverless function that can be accessed through a specific URL endpoint. For instance, if you create a file named route.tsx in the app/api directory, it can be accessed at https://your-domain.com/api/. Next.js seamlessly handles the deployment and routing of these serverless functions.


Within the serverless function file, you can define the logic for proxying requests to other APIs or services. To make HTTP requests to external APIs and retrieve responses, you can employ libraries like axios or utilize built-in modules such as fetch.
Let's take a look at the code for the serverless function that acts as our proxy server:
import axios from 'axios';
import { NextResponse } from 'next/server';

const API_KEY = process.env.RAPIDAPI_KEY;

export async function POST(req: Request) {
    const { url, method = 'GET', params = {}, headers = {} } =await req.json()
  try {
    const response = await axios.request({
      url,
      method,
      params,
      headers: {
         'X-RapidAPI-Key': API_KEY,
         ...headers
      },
    });
    return NextResponse.json(response.data);
  } catch (error:any) {
    return NextResponse.json({message:error.message})
  }
}
In the code above, we import the necessary modules, including axios for making HTTP requests and NextResponse from Next.js for handling responses. We also define the API_KEY constant, representing our sensitive information stored in an environment variable.
The Request function serves as the main entry point for our serverless function. It takes a req parameter representing the request object. Inside the function, we destructure the url, method, params, and headers from the request body.
Using axios, we make a request to the specified url using the provided method, params, and headers. We include the API_KEY in the headers object, along with any additional headers passed in the request.
If the request is successful, we respond with the received data and the corresponding HTTP status code using NextResponse.json(response.data). In case of an error, we handle it and respond with an error message and an appropriate status code.
To use this proxy server in your application, you can make a request to the serverless endpoint /api/proxy and provide the necessary parameters based on your specific use case.
Handling HTTP Methods in Next.js 13: Improved Structure for Serverless Functions
One of the main differences in Next.js 13 is the change in the way serverless functions receive requests. Instead of using a generic handler function, the serverless functions are now named after their respective HTTP methods and are invoked based on the method received in the request.
In previous versions of Next.js, we would typically have a single handler function that handles all incoming requests regardless of the HTTP method. However, with the introduction of Next.js 13, the serverless functions have become more explicit and intuitive.
Now, instead of a generic handler function, we define separate functions for each HTTP method we want to handle. For example, we can have functions named GET, POST, PUT, DELETE, etc., depending on the HTTP methods we want to support.
export async function POST{...}
When a request is received, Next.js automatically invokes the corresponding function based on the HTTP method of the request. This allows for cleaner and more organized code, as each function can focus on handling requests specific to its associated method.
By leveraging this new approach in Next.js 13, we can better structure our serverless functions and improve the clarity and maintainability of our codebase.
Streamlined Request and Response Handling in Next.js 13: Leveraging Readable Streams and NextResponse
One of the notable differences in Next.js 13 is the handling of request and response objects in serverless functions. In this version, these objects are treated as readable streams, and to access their data, we need to call the .json() method on them.
Unlike previous versions, where we needed to import the NextAPIRequest object, Next.js 13 leverages the built-in Request object provided by the browser environment. Similarly, the built-in Response object is available as well, but for more robust functionality, we can use NextResponse from next/server, which needs to be imported explicitly.
import { NextResponse } from 'next/server';

export async function POST(req: Request) {
    const body =await req.json()
  try {
    //axois or fetch call to server
      }
    return NextResponse.json(response.data);
  } catch (error:any) {
    return NextResponse.json({message:error.message})
}
By utilizing the .json() method on the request object, we can easily access the JSON payload sent with the request. This approach simplifies the handling of request data within serverless functions.
On the response side, using NextResponse from next/server provides additional features and flexibility compared to the built-in Response object. Importing NextResponse allows us to handle responses more effectively and customize them as needed.
Overall, Next.js 13's approach to handling request and response objects as readable streams and utilizing the .json() method enhances code readability and provides a more robust and streamlined development experience.
Safeguarding Sensitive Information: Returning Only Response Data and Status Code to the Client
In the previous code snippet, the line return NextResponse.json(response.data); plays a crucial role in presenting the client with only the response data and status code, while safeguarding any sensitive information.
Let's examine how this process works and why it ensures the client receives only the necessary information:
NextResponse.json(response.data): This constructs the response using theresponse.dataobtained from the external API request. By invokingNextResponse.json(), we ensure that the client receives a JSON-formatted response containing the data returned by the external API. The response data is extracted from theresponseobject obtained through theaxiosrequest.
return NextResponse.json(response.data)
- Sending the Response: By returning
NextResponse.json(response.data), we send the constructed response back to the client. The response includes the relevant data retrieved from the external API.
By separating the response data and status code, we achieve several benefits:
Enhanced Security: Sensitive information, such as the API key used to make the request, remains hidden from the client. The client only receives the necessary response data and status code, ensuring the security of any confidential information.
Controlled Information Flow: By selectively returning specific data, we can control what information is accessible to the client. This approach prevents unnecessary exposure of implementation details or sensitive information that might be used in the proxy server.
Error Handling: The separation of response data and status code allows for effective error handling. By examining the status code, the client can determine if the request was successful or encountered an error. This enables appropriate handling of error scenarios and provides relevant feedback to the user.
In the client-side code, as demonstrated in the blog article, the response data is utilized to display Bitcoin exchange rates. The client-side logic checks if the data variable is available and then renders the relevant information to the user. This way, the user only sees the fetched data and isn't exposed to any underlying implementation details or sensitive information used in the proxy server.
By carefully managing the response data and status code, we establish a secure and controlled information flow between the serverless function, client-side code, and end-user.
Integrating the Proxy Server in a Next.js Component
Now that our proxy server is implemented, let's explore how we can integrate it into a Next.js component. In this example, we'll create a component called BitcoinPrices that utilizes the proxy server to fetch Bitcoin exchange rates.
To learn more about creating the BitcoinPrices component and integrating the proxy server, you can refer to our previous article on Integrating the Proxy Server in a Next.js Component. This article provides detailed instructions and code examples to help you seamlessly incorporate the proxy server functionality into your Next.js application.
By following the guidance provided in the linked article, you'll be able to leverage the power of the proxy server in the BitcoinPrices component and efficiently fetch Bitcoin exchange rates while ensuring the security of sensitive information.
Let's dive into the integration process and leverage the proxy server to enhance the functionality of our BitcoinPrices component.
import React from 'react'
import axios from 'axios'
import { useState, useEffect } from 'react'
import Image from 'next/image'

export default function BitcoinPrices() {
  const [data, setData] = useState < any > null

  useEffect(() => {
    if (!data) fetchData()
    return () => {}
  }, [])

  const fetchData = async () => {
    try {
      const response = await axios.post('/api/proxy', {
        url: 'https://alpha-vantage.p.rapidapi.com/query',
        params: {
          from_currency: 'BTC',
          function: 'CURRENCY_EXCHANGE_RATE',
          to_currency: 'USD',
        },
        headers: {
          'X-RapidAPI-Host': 'alpha-vantage.p.rapidapi.com',
        },
      })
      setData(response.data)
    } catch (error) {
      console.error('Error fetching data:', error)
    }
  }

  return (
    <>
      <div className="min-w-20 m-10 rounded-lg bg-gray-100 p-6 shadow-md">
        <Image src="/images/bitcoin.png" width="200" height="100" alt="bitcoin" />
        {data ? (
          <>
            <p>
              <span className="text-2xl font-semibold text-blue-900">
                Exchange Rate:
                {parseFloat(data['Realtime Currency Exchange Rate']['5. Exchange Rate']).toFixed(2)}
                ({data['Realtime Currency Exchange Rate']['3. To_Currency Code']})
              </span>
            </p>
            <p>
              <span className="text-sm">
                From Currency:
                {data['Realtime Currency Exchange Rate']['1. From_Currency Code']}({
                  data['Realtime Currency Exchange Rate']['1. From_Currency Code']
                })
              </span>
            </p>
            <p>
              <span className="text-sm">
                To Currency:
                {data['Realtime Currency Exchange Rate']['4. To_Currency Name']}({
                  data['Realtime Currency Exchange Rate']['3. To_Currency Code']
                })
              </span>
            </p>
            <p>
              <span className="text-xs">
                Last Refreshed:
                {data['Realtime Currency Exchange Rate']['6. Last Refreshed']}
                {data['Realtime Currency Exchange Rate']['7. Time Zone']}
              </span>
            </p>
          </>
        ) : (
          <p>loading...</p>
        )}

        <button
          className="rounded bg-blue-500 px-4 py-2 font-bold text-white hover:bg-blue-700"
          onClick={fetchData}
        >
          Refresh Data
        </button>
      </div>
    </>
  )
}
Within our component, we define the BitcoinPrices function component. Inside this component, we utilize the useState and useEffect hooks to manage the component's state and initiate data fetching upon component mount.
To fetch the Bitcoin exchange rates, we employ the fetchData function, which sends a POST request to /api/proxy while providing the necessary parameters. These parameters include the url, params, and headers required by the proxy server to retrieve the data from the Alpha Vantage API.
Upon a successful response, we update the component's state with the received data. In case of an error, we log an appropriate error message to the console for debugging purposes.
In the JSX of the component, we incorporate the Bitcoin logo using Next.js' Image component. When the data is available, we display the exchange rate, currency details, and the last refresh information to the user. On the other hand, while waiting for the data to load, we render a "loading" message.
Additionally, we render a button that triggers the fetchData function when clicked. This provides the user with the option to manually refresh the Bitcoin exchange rates.
By implementing this functionality within the BitcoinPrices component, we ensure a seamless integration of the proxy server, enabling dynamic fetching of Bitcoin exchange rates while delivering an intuitive user experience.

Having visibility into the details of API calls is crucial when working with APIs and proxy servers. Web developer tools, like the Network panel in Chrome, provide valuable insights into API calls, including request and response headers, payload, and timing.
By opening the Network panel, developers can access comprehensive information about each API call made by the application. This includes the details of our proxy server implementation.
In our proxy server, we take measures to protect sensitive information, such as the API key. The API key is obfuscated in the URL to ensure it is not directly visible when inspecting the API call in the Network panel. Instead, we pass the API key as a header, specifically the 'X-RapidAPI-Key' header. This header is added to the request headers within the serverless function, ensuring the secure transmission of the API key.
By utilizing web developer tools like the Network panel, developers can gain valuable insights into the API calls made by the application, ensuring proper handling of sensitive information and facilitating effective debugging and monitoring processes.
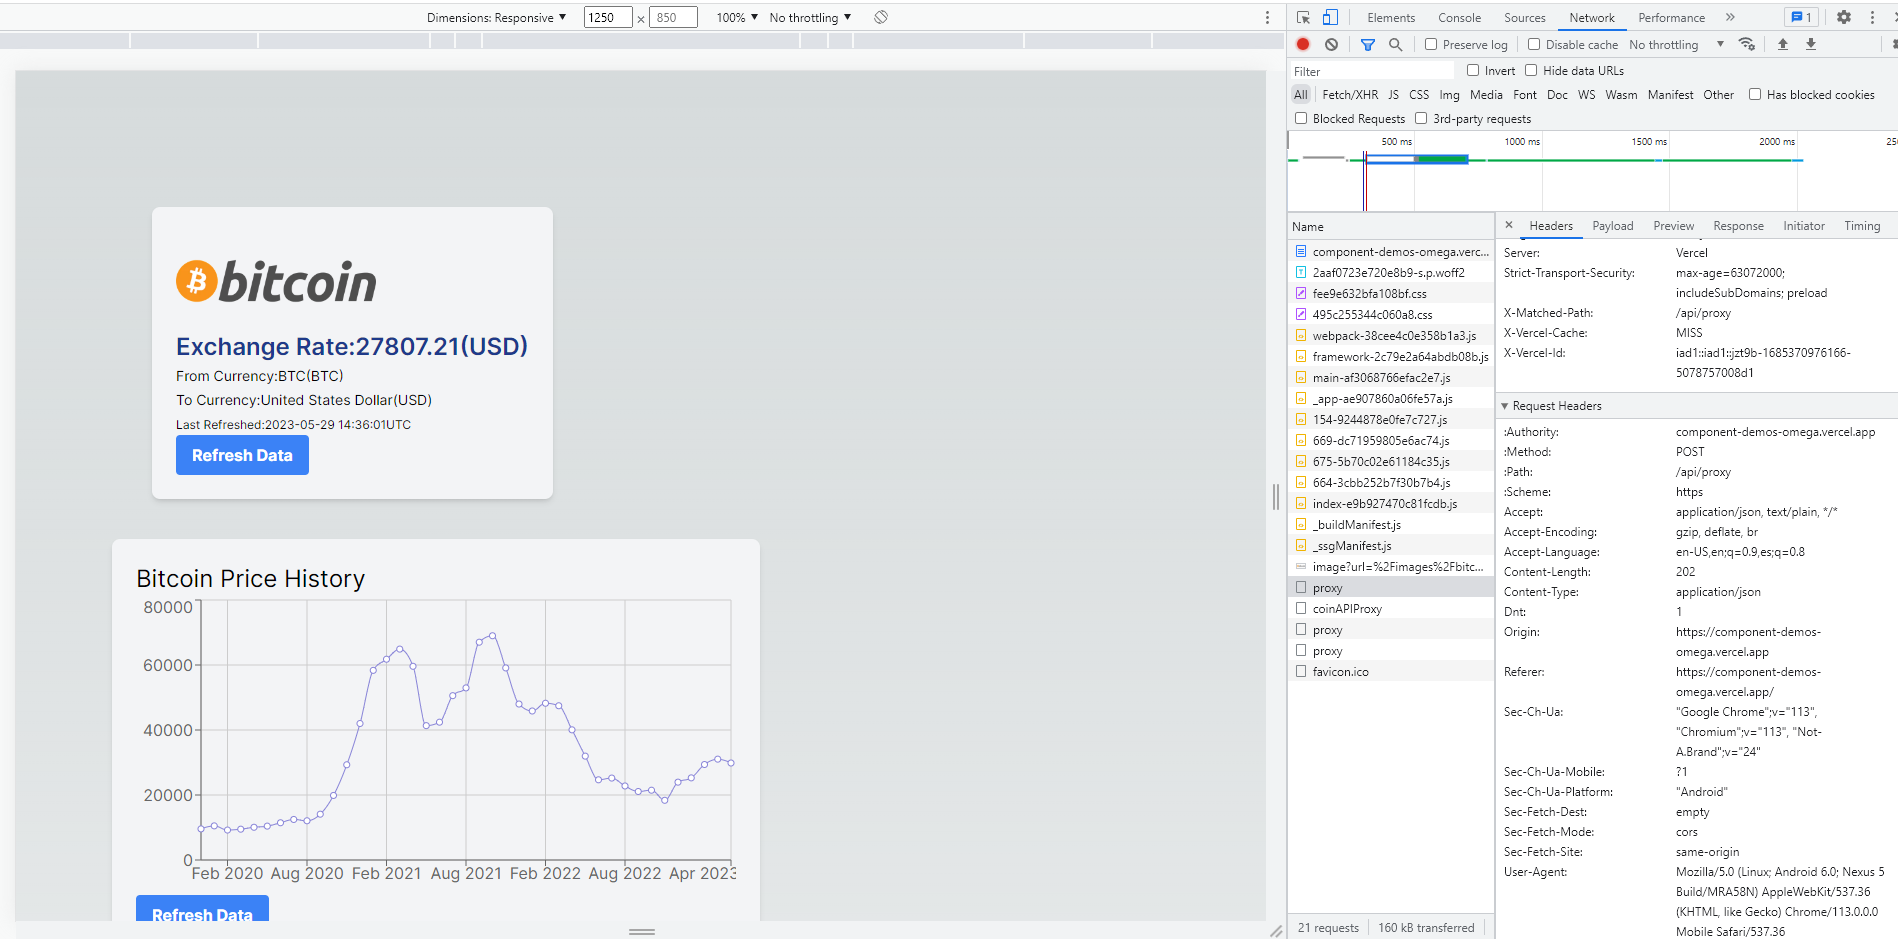
By obfuscating sensitive information in this manner, we take a proactive step in safeguarding it from potential exposure within the URL. This added layer of security prevents unauthorized access to our sensitive data by individuals inspecting the network traffic.
Web developer tools, including the Network panel, serve as invaluable resources for effectively analyzing and debugging API calls. These tools enable us to ensure the accurate fetching and transmission of data throughout our application. Specifically, when working with APIs and proxy servers to conceal sensitive information, the Network panel becomes an essential component of our toolkit.
By leveraging web developer tools, we empower ourselves as developers to efficiently monitor and troubleshoot our applications. This not only enhances the security of our sensitive information but also contributes to the overall stability and reliability of our system.
If you're interested in exploring the source code for this project, you can find it on the GitHub repository at github.com/smmk123/component-demos. This repository houses a collection of component demos, including the implementation of the proxy server using Next.js and the BitcoinPrices component.
By delving into the source code, you can delve deeper into the intricacies of utilizing Next.js and serverless functions to create a robust proxy server. Additionally, you can examine how the BitcoinPrices component interacts with the proxy server to retrieve Bitcoin exchange rates.
Feel free to explore the repository, analyze the code, and, if you're inclined, contribute to further enhancing the project. Whether you identify areas for improvement or have innovative ideas to refine the implementation, your contributions are welcome. Let's collaborate and make the project even better together!